How to Localize your React App using Tolgee Toolkit
And not lose International clients.

I am a developer from India with a good eye for frontend logic and design. I am also well acquainted with the backend and business logic so that's add to my ability to create a good frontend while making it easily integratable with backend.
If you do business online you should use website localization to increase your international and interstate customer conversions.
Even if the majority of your customers are local, you should be thinking about the international visitors who reach your side willing to give you their business.
If you are not Localizing your website you are losing International clients every day.
But what is website Localization?
While the term is self-explanatory, but let me go ahead and explain the concept to you anyways. As most businesses are moved to the internet in the last decade, businesses small or big have access to a new market like never before. It doesn't take a genius to figure out the need for website translation.
After all, you won't buy something you don't understand no matter how great is the product. The same happens with all the website traffic you are getting from international clients who can't understand your language. No matter how great your products or services are, you won't be able to sell them.
Website Localization Involves.
Adapting content to international or regional audiences.
Ensuring cultural compatibility.
Adapting images, colors, and icons, where necessary
Adjusting layout to accommodate content
Conversion of units of measure and currencies
Adapting local formats (phone numbers, dates, etc.)
Complying with local legalization
Localization and linguistic testing
In this article, we will only talk about Localization and linguistic testing, where we translate our website according to the region.
If you know nothing about Localization here is a video about how to localize web apps using javascript.
Now that you have seen how problematic and long a process this can be let's see how Tolgee solves this process in easy steps.
1. What is Tolgee Toolkit
Tolgee Toolkit is an open-source localization tool that is developer-friendly and easy to set up in our local infrastructure.
Tolgee's main focus is on providing
- In context localization
- Developer Friendly localization process
- An easy web app to handle Everything
Let's get started
2. Setting Up React App
First, we will set up our React app, for this tutorial I used the create-react-app framework.
I went ahead and created a skeleton of the website so that you won't have to code much and can directly jump into the localization logic part.
open your favorite terminal and clone the repository.
git clone https://github.com/Ashumaurya/Localization-in-React/tree/website
after this just go type
yarn install

 //or

npm install
and wait for the node modules to get installed. Once finished downloading, start the react server with the following command and visit the website
yarn start

//or

npm start
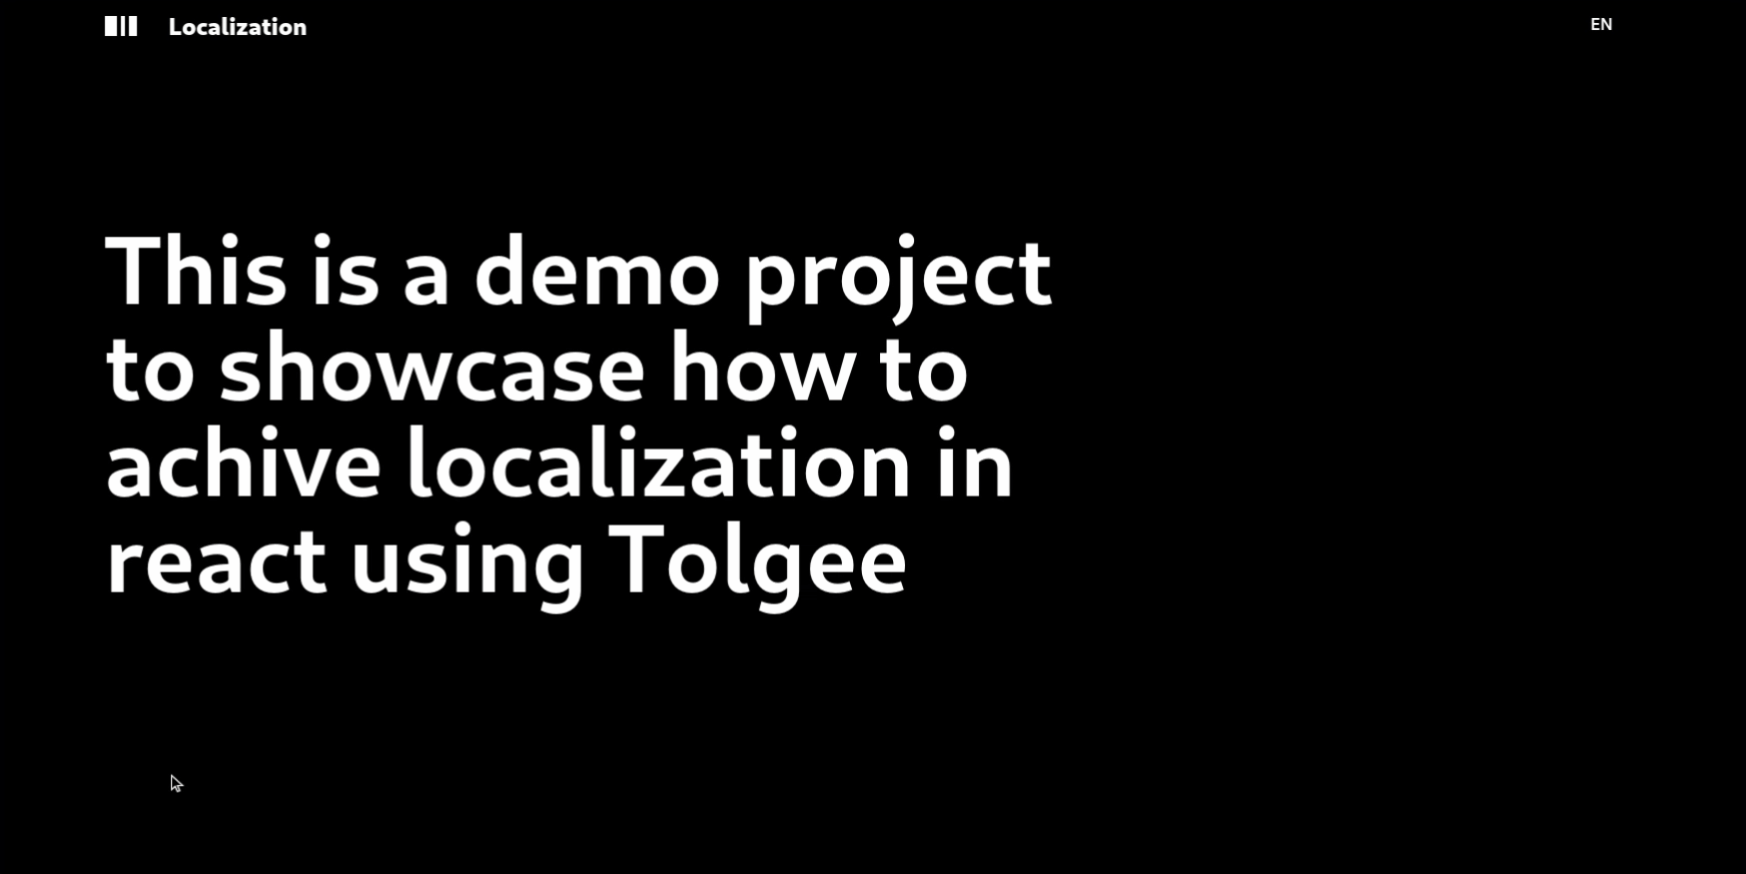
Open your web browser and open http://localhost:3000. You will have something like the following in your web browser.
You can follow the above step or create your own app with CRA. Here is a tutorial for this.
3. Setting up Tolgee toolkit
Now we will set up our Tolgee toolkit for our project. Let's get started
open up your terminal and write the following command
 docker run -v tolgee_data:/data/ -p 8085:8080 \
-e tolgee.authentication.enabled=false \
tolgee/tolgee
This command runs tolgee/tolgee image with volume tolgee_data mounted into /data directory and exposes port 8085. The parameter -e tolgee.authentication.enable=falsedisables authentication, so you can use Tolgee Server locally without logging in. The output of this command should end with something like the following:
..... Tomcat started on port(s): 8080 (HTTP) with context path
..... Application.Companion in 9.108 seconds (JVM running for 9.564)
That means that the server is started and you should be able to access the web application on http://localhost:8085. When accessing this URL, you should see a web application that looks like this:
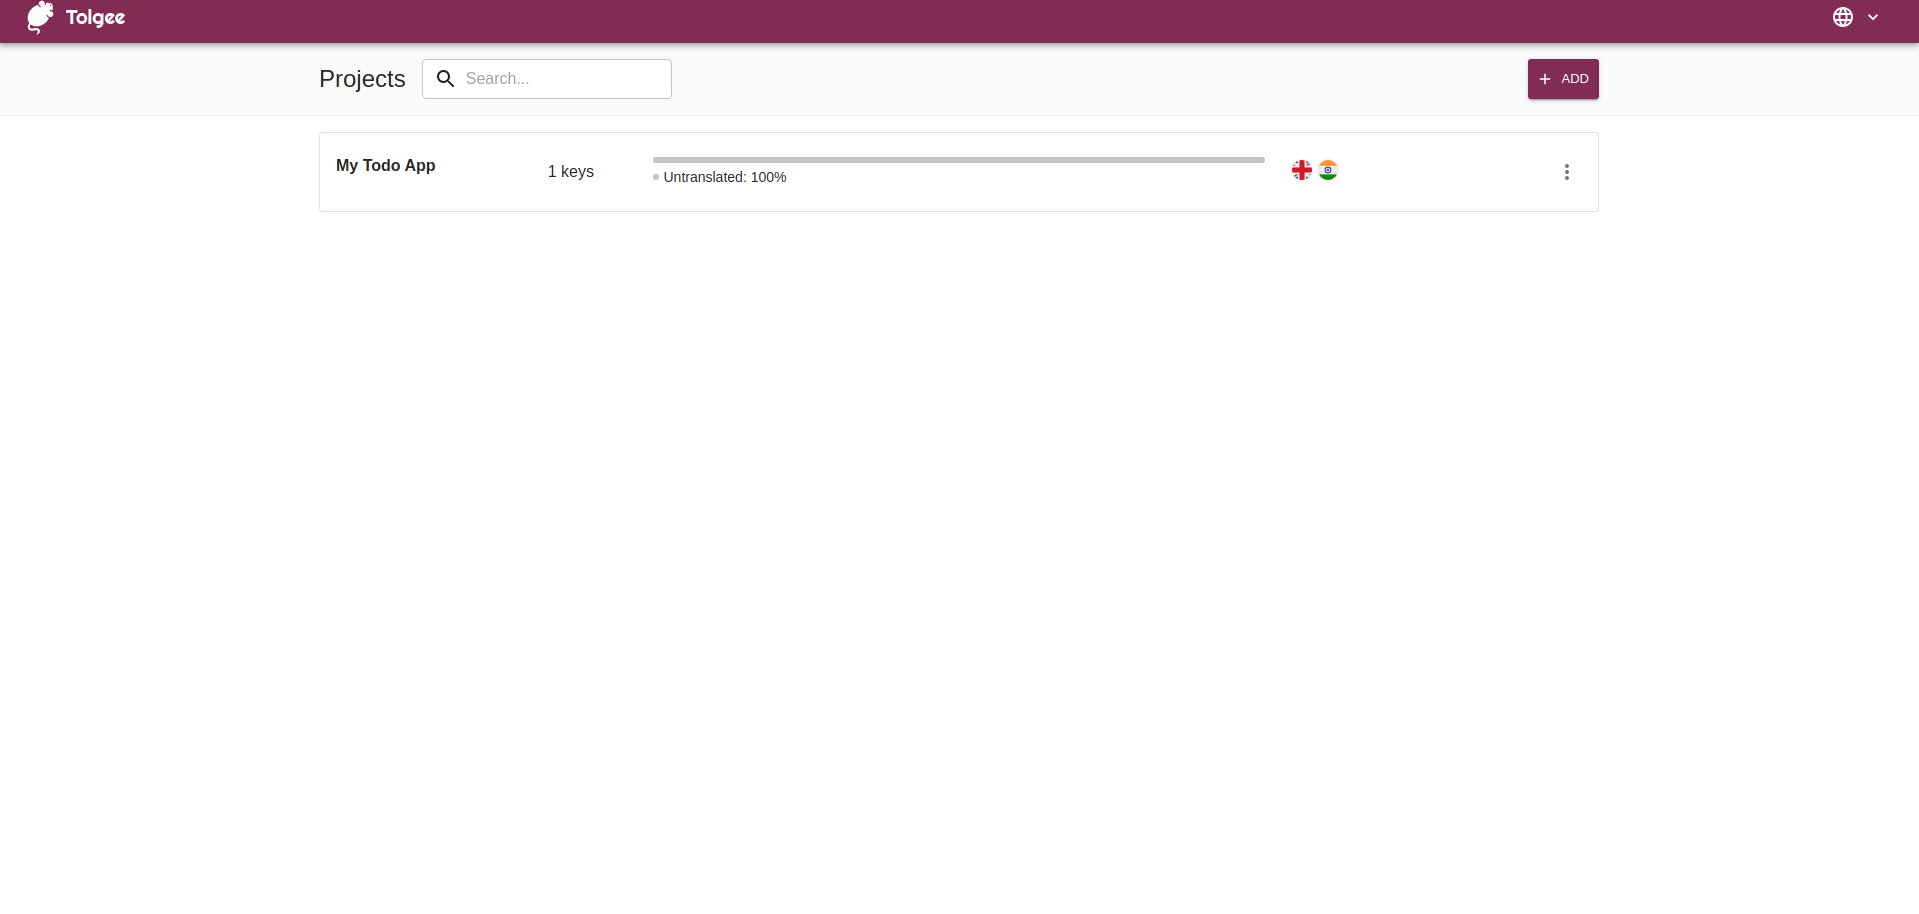
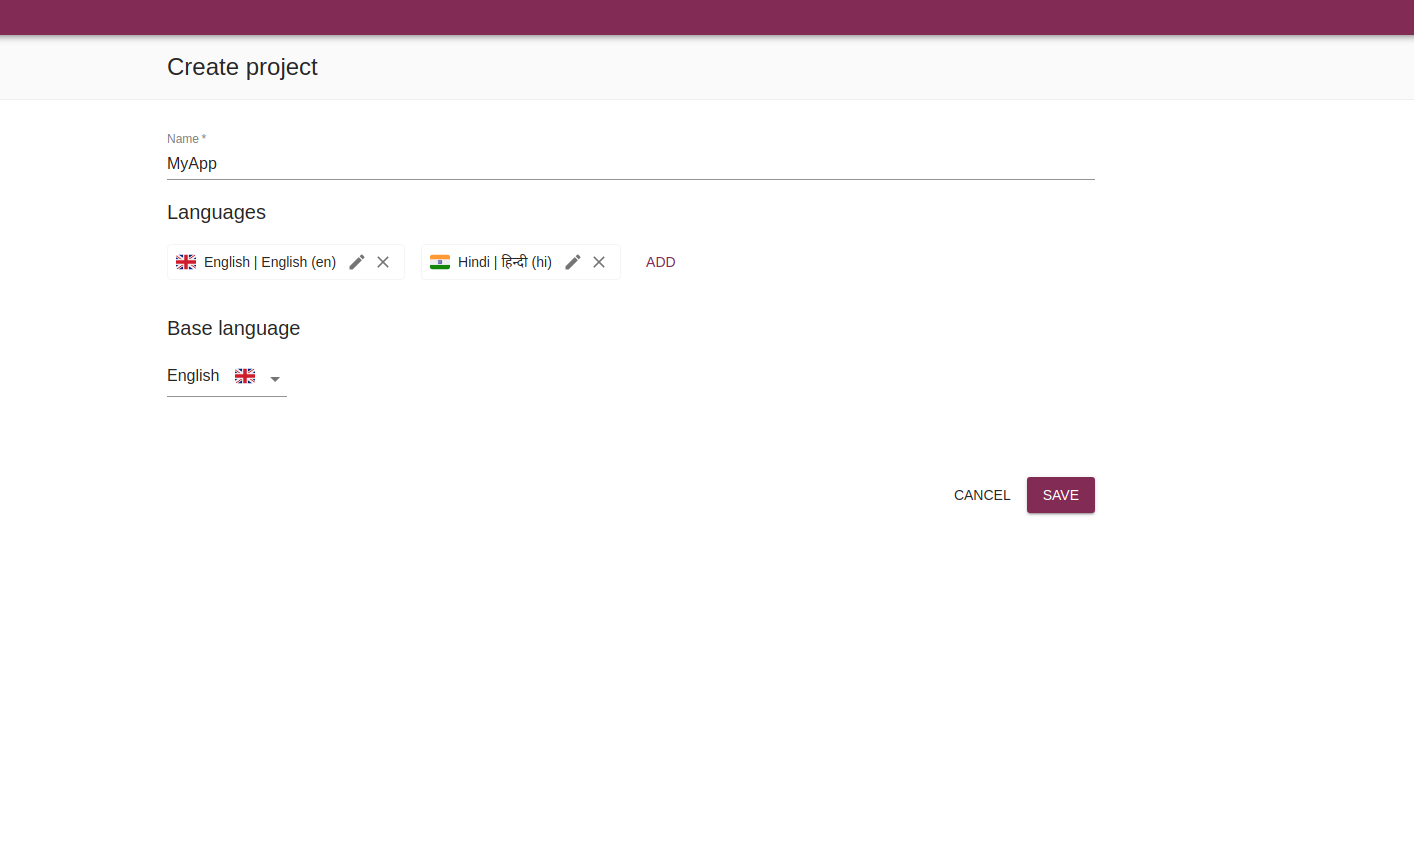
now all you need to do is create a new project by clicking on Add and set up a new project. You can add multiple languages but for this project, I am only adding English and Hindi.
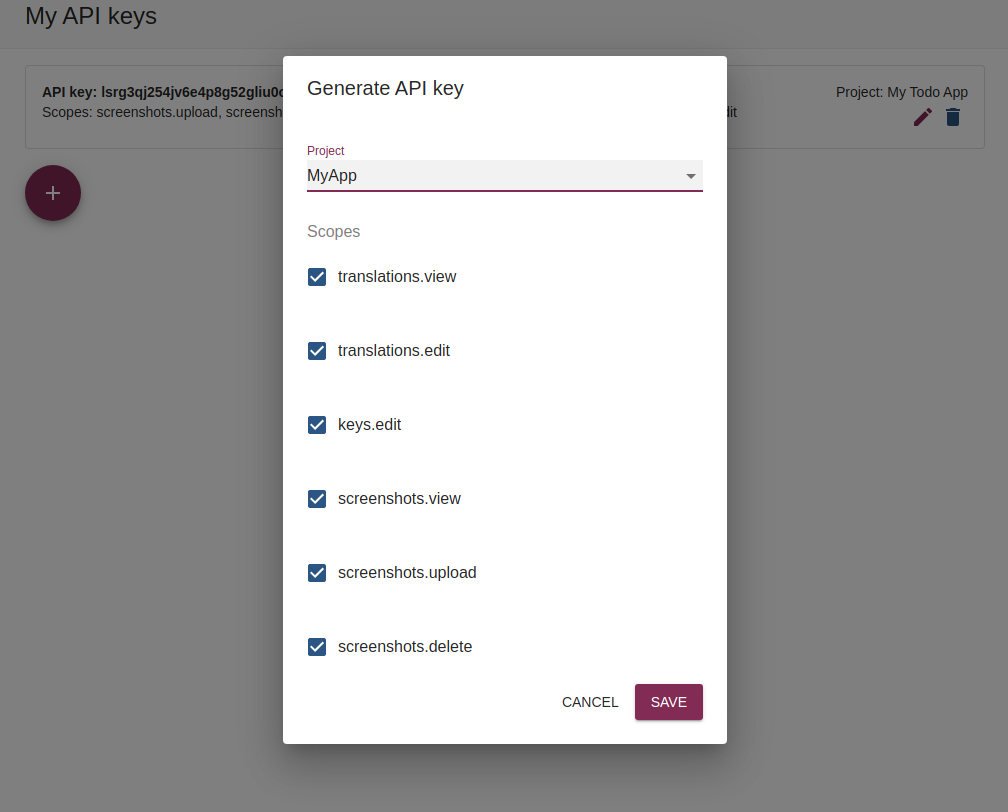
now save the project and click on the project after that click on the API keys menu and create a new API key for your project and copy it.
Now, create a new file in the root folder of your project and name it .env.local, and inside it put your API key like the below image.
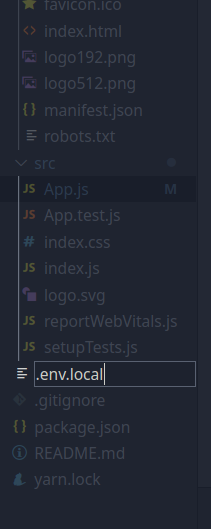
REACT_APP_TOLGEE_API_KEY= <Your api key Here>
REACT_APP_TOLGEE_API_URL=http://localhost:8085
Now restart your server. After every time you edit .env files always restart your server.
4. Translating the React App
To translate the React App, you need to install required packages, store the API key and API URL in .env files, wrap the whole application with configured TolgeeProvider component and use the T component to translate our keys.
Installing Tolgee dependencies
Install these dependencies via npm or yarn:
npm install --save-dev @tolgee/core @tolgee/react @tolgee/ui

or

yarn add --save-dev @tolgee/core @tolgee/react @tolgee/ui
Wrapping application with TolgeeProvider component
Since we have provided our configuration using .env files, now we can use it in our application. Let's edit src/index.js and wrap the component with the TolgeeProvider component. The result will look like this:
import React from "react";
import ReactDOM from "react-dom";
import "./index.css";
import App from "./App";
import reportWebVitals from "./reportWebVitals";
import { TolgeeProvider } from "@tolgee/react";
import { UI } from "@tolgee/ui";

ReactDOM.render(
  <React.StrictMode>
    <TolgeeProvider
      apiKey={process.env.REACT_APP_TOLGEE_API_KEY}
      apiUrl={process.env.REACT_APP_TOLGEE_API_URL}
      ui={process.env.REACT_APP_TOLGEE_API_URL ? UI : undefined}
      availableLanguages={["en", "hi"]}
    ></TolgeeProvider>
    <App />
  </React.StrictMode>,
  document.getElementById("root")
);
The UI property provides a constructor of the UI class. The UI package is separated from @tolgee/core to save some bundle size in production mode. available languages prop tells Tolgee, which languages are supported. It automatically chooses the default language by the user's system setting, so it needs to know, which languages are supported.
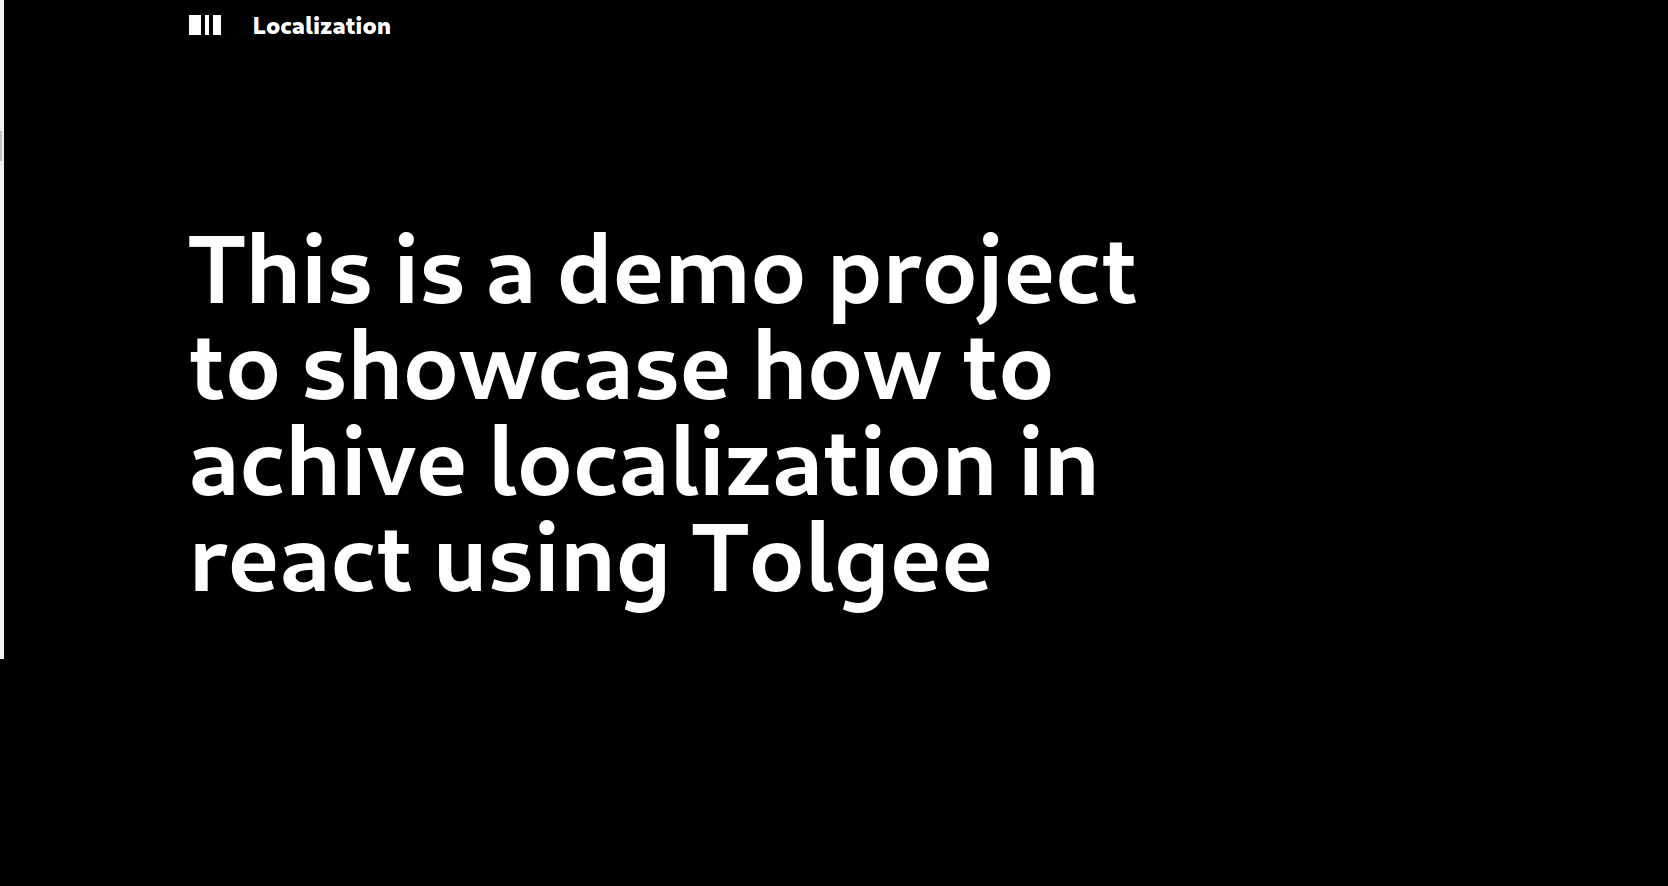
OK, that's it! Now we're ready to prepare our application for in-context translating by wrapping every localization key with component.
Wrapping localization texts with Tolgee component
In my case, it will be Hero-area.
{/* *********************** Hero Area ******************* */}
 <div className="hero-area font-bold lg:text-8xl md:text-6xl md:my-40  my-20 2xl:w-2/3 xl:w-4/5 md:w-2/3 text-4xl">
     <p>
          <T>
          This is a demo project to showcase how to achive localization in
            react using Tolgee
          </T>
      </p>
        </div>
and also
       <div className="about-description py-20 text-2xl md:w-2/3 ">
            <p>
        <T>
              This project is to explain the viewers how localization can be
              easily achived in React using Tolgee. And how important it is for
              businesses
         <T>
            </p>
            <p className="my-10 text-blue-600 cursor-pointer">
              Read full blog
            </p>
          </div>
Let's start our server now by running yarn start or npm start.
Let's add a dropdown menu button to our website.
We will use this amazing example by Creative-time and copy this code to a new component called dropdown.js. Once done we will edit the code as we want and it will look something like this :
import React, { useState } from "react";
import { createPopper } from "@popperjs/core";
import { useCurrentLanguage, useSetLanguage } from "@tolgee/react";
export const Dropdown = ({ color }) => {
  // dropdown props
  const [currentLanguage, setCurrentLanguage] = useState("En");
  const [dropdownPopoverShow, setDropdownPopoverShow] = React.useState(false);
  const btnDropdownRef = React.createRef();
  const popoverDropdownRef = React.createRef();
  const getLang = useCurrentLanguage();
  const setLang = useSetLanguage();
  const currentLang = getLang();
  const openDropdownPopover = () => {
    createPopper(btnDropdownRef.current, popoverDropdownRef.current, {
      placement: "bottom-start",
    });
    setDropdownPopoverShow(true);
  };
  const closeDropdownPopover = () => {
    setDropdownPopoverShow(false);
  };

  return (
    <>
      <div className="flex flex-wrap">
        <div className="w-full sm:w-6/12 md:w-4/12 px-4">
          <div className="relative inline-flex align-middle w-full">
            <button
              className={
                " font-bold uppercase text-md px-2 py-1 rounded shadow hover:shadow-lg outline-none focus:outline-none mr-1 mb-1 ease-linear transition-all duration-150 "
              }
              type="button"
              ref={btnDropdownRef}
              onClick={() => {
                dropdownPopoverShow
                  ? closeDropdownPopover()
                  : openDropdownPopover();
              }}
            >
              {getLang()}
            </button>
            <div
              ref={popoverDropdownRef}
              className={
                (dropdownPopoverShow ? "block " : "hidden ") +
                // (color === "white" ? "bg-white " : bgColor + " ") +
                "text-base z-50 float-left py-2 list-none text-left rounded shadow-lg mt-1"
              }
              style={{ minWidth: "12rem" }}
            >
              <a
                href="#pablo"
                className={
                  "text-sm py-2 px-4 font-normal block w-full whitespace-nowrap bg-transparent " +
                  (color === "white" ? " text-blueGray-700" : "text-white")
                }
                onClick={(e) => {
                  e.preventDefault();
                  setDropdownPopoverShow(!dropdownPopoverShow);
                  setLang("en");
                }}
              >
                En
              </a>
              <a
                href="#pablo"
                className={
                  "text-sm py-2 px-4 font-normal block w-full whitespace-nowrap bg-transparent " +
                  (color === "white" ? " text-blueGray-700" : "text-white")
                }
                onClick={(e) => {
                  e.preventDefault();
                  setDropdownPopoverShow(!dropdownPopoverShow);
                  setLang("hi");
                }}
              >
                Hi
              </a>
            </div>
          </div>
        </div>
      </div>
    </>
  );
};
once done let's add this component to our app.js so that we can actually access it.
<div className="header flex items-center py-4 w-full">
          <div className="header flex items-center flex-grow">
            <div className="width-1 h-5 w-3 bg-white"></div>
            <div className="width-1 h-5 w-1 bg-white mx-1"></div>
            <div className="width-1 h-5 w-2 bg-white mr-4"></div>
            <div className="logo text-2xl font-black mx-4 ">Localization</div>
          </div>
          <div className="flex justify-end">
            <Dropdown color={"white"} />
          </div>
        </div>
Now we will have something like the below result. But toggling between languages will now do anything for now. We need to add the language to the texts we have surrounded with the <T> component.
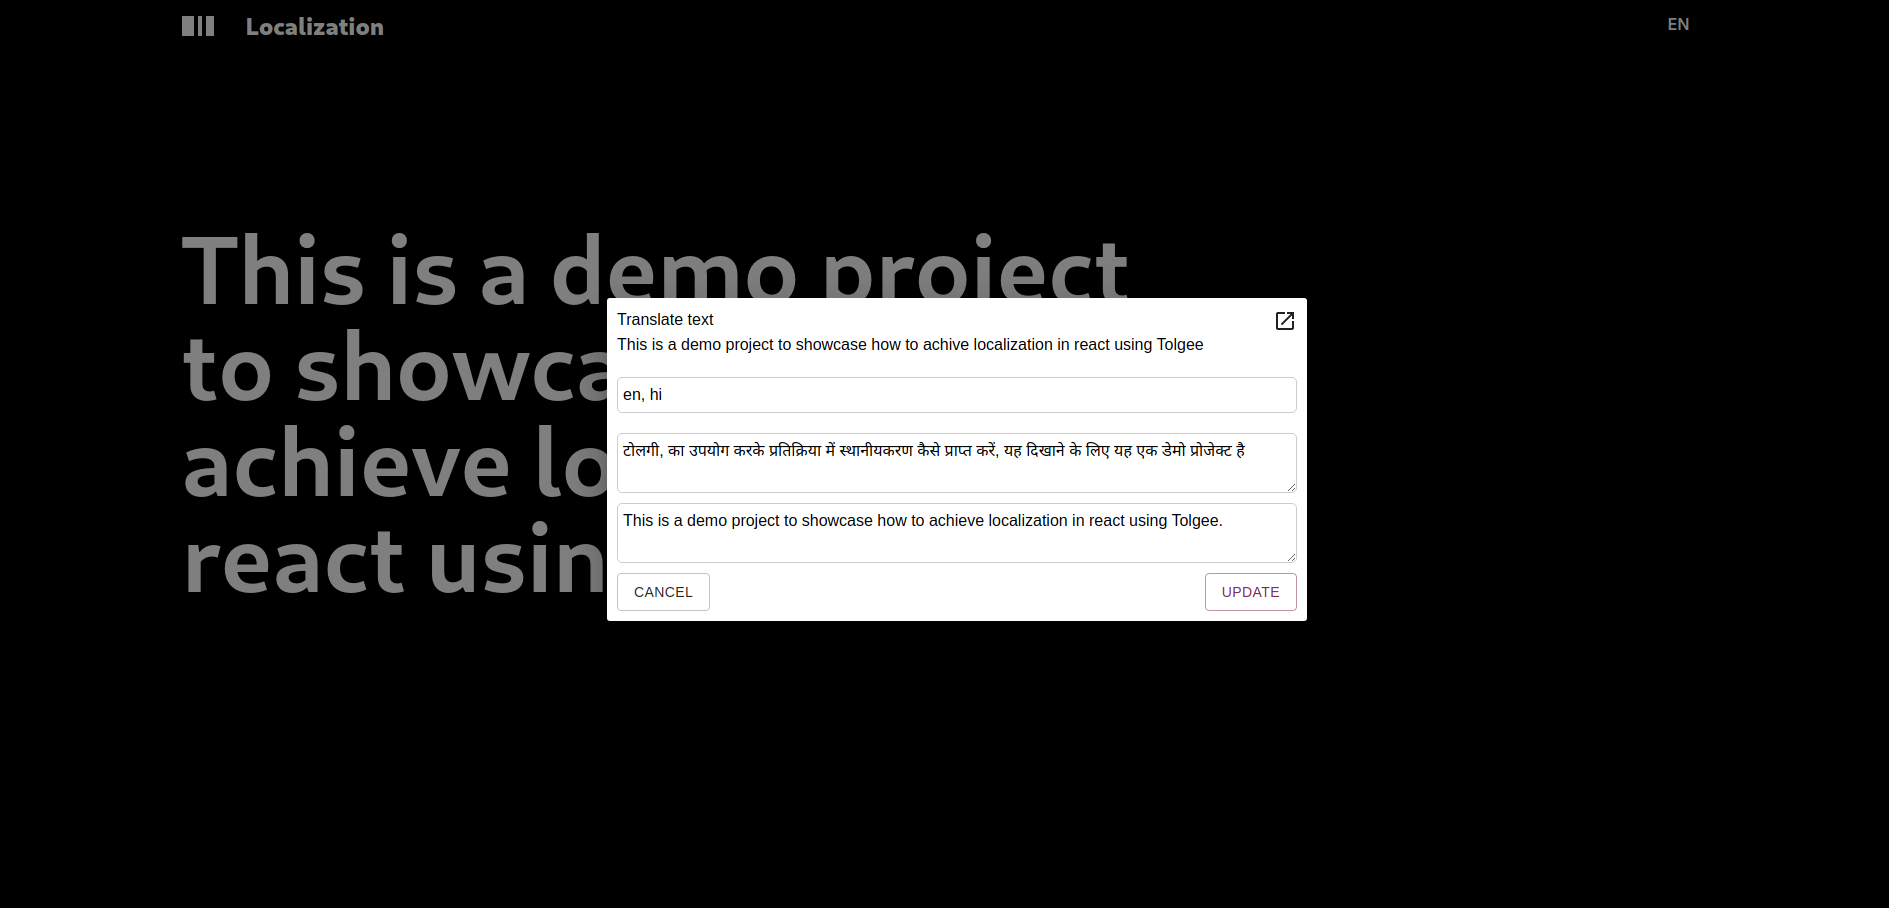
Now, all we need to do is hold ALT and click on the text you wanna edit, after clicking a new dialogue box will be opened. Enter the translated text into it and save it.
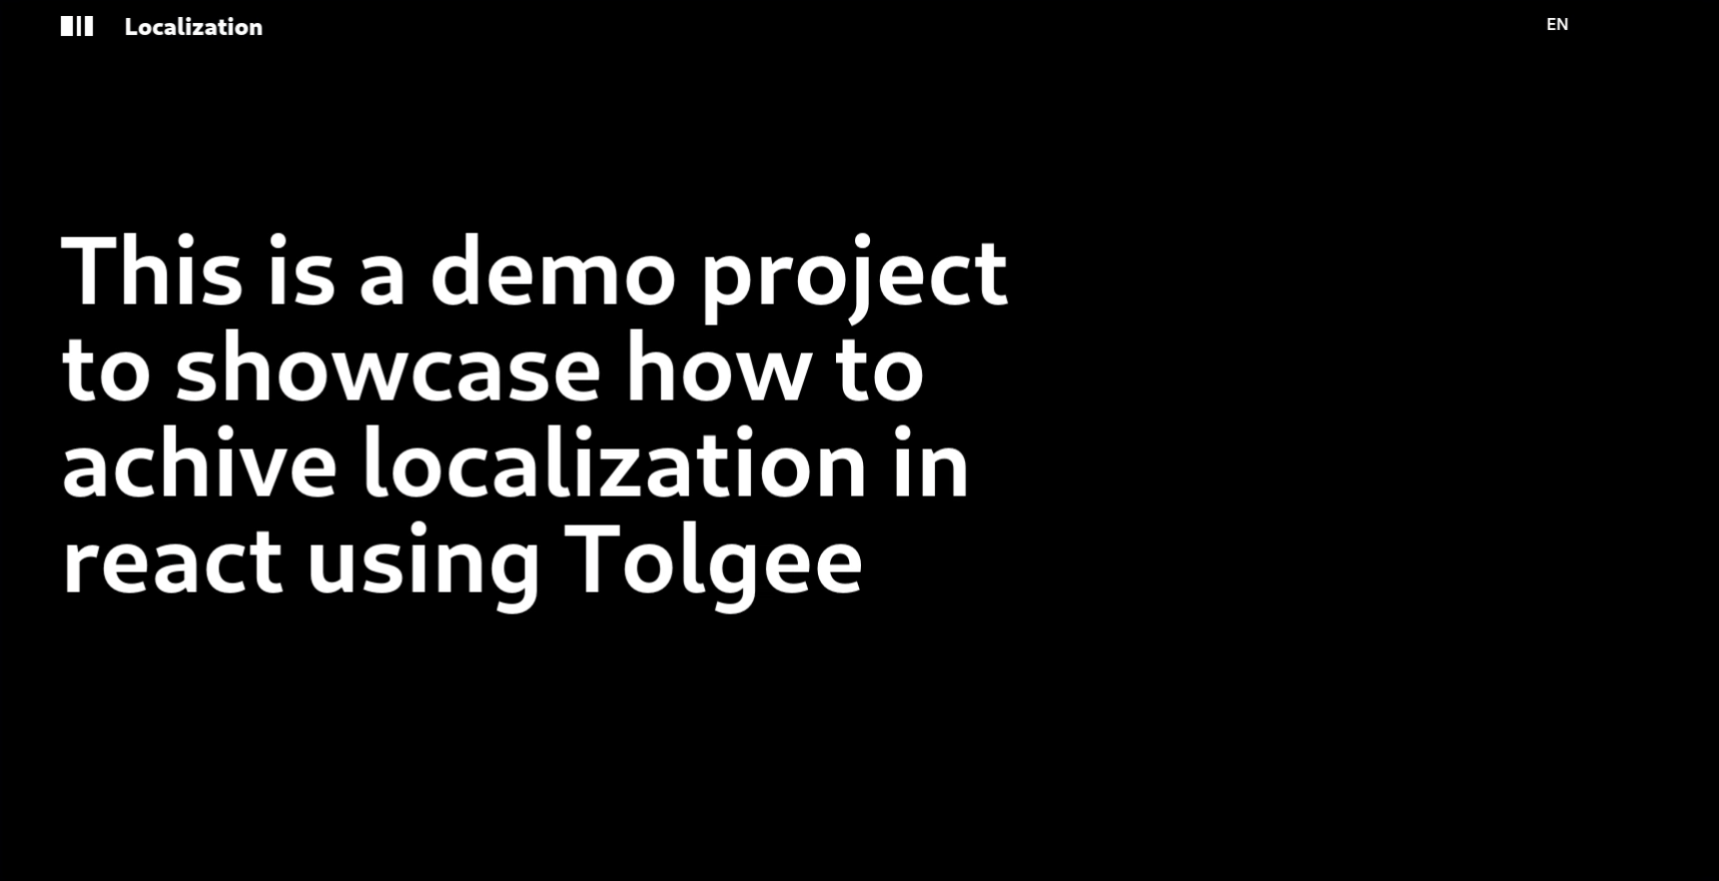
once done you can actually click on the language toggler and see the change by yourself, it will be something like below.
Now you are done with the development part now let's see how we make this production-ready.
5. Preparing your App for production
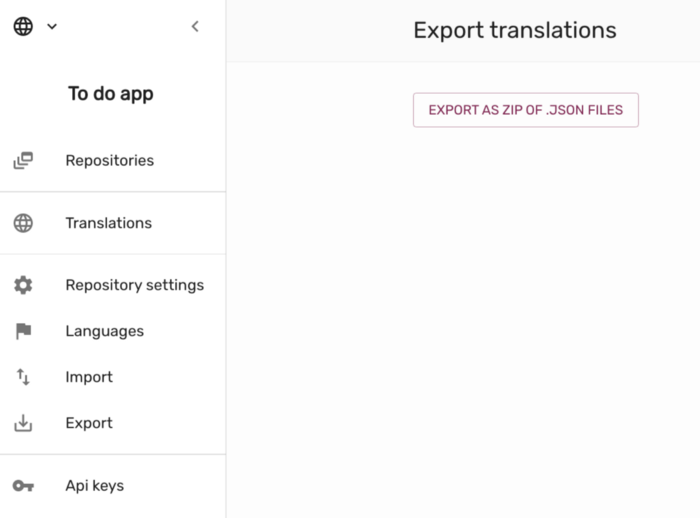
You should never leak your API key. Leaking of API keys could lead to situations when anybody can edit your translation data. That is the reason, why we stored the API key in .env.local, which is not part of your git repository. But when there is now an API key, how can the Tolgee library load the translations? It can't. So we need to provide the localization files as a static asset. To do so, let's export the data from Tolgee Web Application.
Enter the application, and choose the “Export” item from the side menu. Then hit “EXPORT AS ZIP OF . JSON FILES”. The download should start immediately.
once exported place the file inside the public/i18n folder like below.

Once done you can remove the API key from your .env.local file and see for yourself that the toggle between languages works but not the editing part. This means your app is ready for production.
Summary
In this tutorial, we learned how to localize our React app using Tolgee. We also learned how to set up the Tolgee app and make our app ready for Production.
Here is a repository for the codebase:- https://github.com/Ashumaurya/Localization-in-React/
Congratulation to the Toglee team for building such an amazing and dev-friendly tool for localization.
To learn more about Tolgee Toolkit, visit our documentation on https://toolkit.tolgee.io. We will be happy for any type of contribution or feedback. Don' worry to contact Tolgee via info@tolgee.io.
If you liked the content follow me on Twitter.