

Handling JWT Access and Refresh Token using Axios in React App

I am a developer from India with a good eye for frontend logic and design. I am also well acquainted with the backend and business logic so that's add to my ability to create a good frontend while making it easily integratable with backend.
Hey Readers, How have you been? I hope you are safe and sound. Well, recently I have been working as a frontend dev for a startup and have to implement an Authentication system in their frontend.
Well if you already don't know it there are famously two ways people handle authentication in their products nowadays.
JWT tokens
OAuth
Well, you can learn about them on the internet there are 100s of blogs and videos for them.
Now let me explain to you guys how to use the first method in React.
JWT Token
JSON Web Tokens also commonly known as JWT are used to authenticate a client to the server. It can be used for login or other things.
JSON Web Tokens are an open, industry-standard RFC 7519 method for representing claims securely between two parties.
eyJhbGciOiJIUzI1NiIsInR5cCI6IkpXVCJ9.eyJzdWIiOiIxMjM0NTY3ODkwIiwibmFtZSI6IkpvaG4gRG9lIiwiaWF0IjoxNTE2MjM5MDIyfQ.SflKxwRJSMeKKF2QT4fwpMeJf36POk6yJV_adQssw5c
above is an example JWT web token it can be decoded in the below format
Header
{
  "alg": "HS256",
  "typ": "JWT"
}
Payload
{
  "sub": "1234567890",
  "name": "John Doe",
  "iat": 1516239022
}
Verify Signature
HMACSHA256(
  base64UrlEncode(header) + "." +
  base64UrlEncode(payload),

your-256-bit-secret

)
JWT Auth Token and JWT Refresh Token
A JWT architecture usually has two parts one is authToken and others are refreshToken. Where authToken is responsible for authenticating the user and refreshToken is responsible for getting the new authToken from the backend without asking for username and password from the user.
Yes! authTokens expires. Well for security purposes we set up our authToken in such as way that it expires in a while and uses the refresh token to fetch the authToken back.
Understanding the flow of JWT.
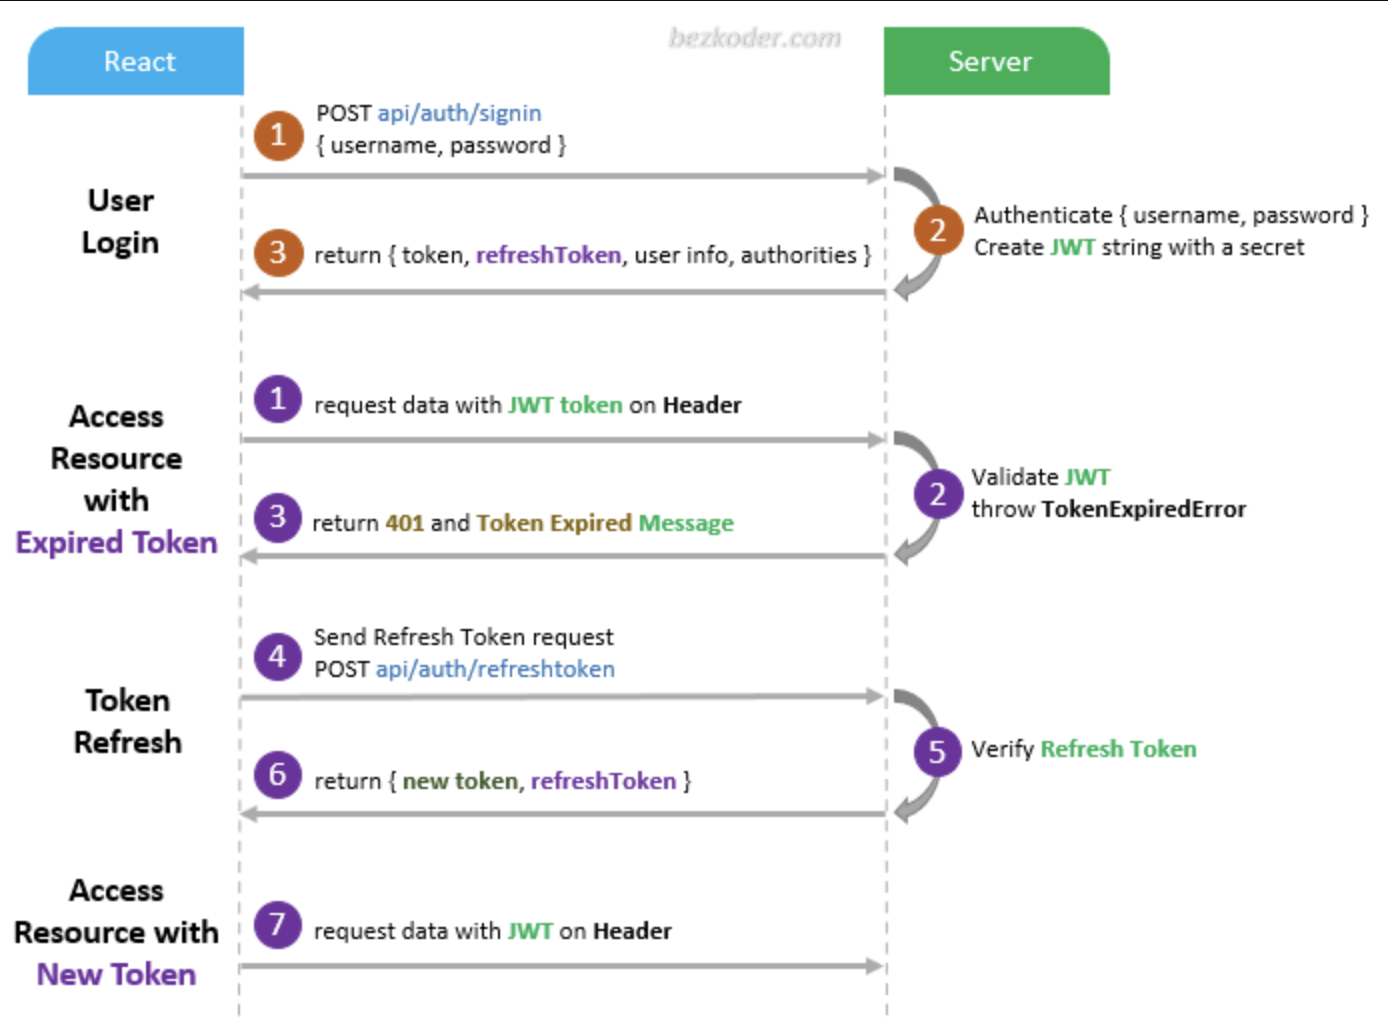
User Logins: User logins with username (email) and password which then goes back to the server to create a new JWT token. A simple JWT token contains JWT
authTokenand JWTrefreshTokenboth tokens have an expiry generally andrefreshTokenshould always have a greater expiry date thanauthToken.Token Received: Once the JWT token is received by the front end they can save that JWT token into local storage or to an in-memory store like Redux. Depends on preferences but there are some standard ways to do that.
Making Calls: Once the JWT token is saved, all calls which use authentication/authorisation ( Yes mate both are different concepts) uses this JWT token to successfully validate the request.
Token expiry: Once the JWT token is expired which as we already know going to happen the JWT refresh token is used to authenticate the API call and used to fetch the new JWT tokens. (Note: Refresh token can only authenticate the API route which is used to get the new tokens)
Using the new Auth Tokens: Once you get the new JWT tokens you can use the
authTokensto make the API calls to the server.Repeat the Process: Keep repeating the process to get the new
authTokensand making the API call.
Handling JWT Token in React.
Well, you might be working on just the front end and you might have an API endpoint to get the JWT authToken and JWT refreshToken.
let's create a new component to get the auth token. We will call it login.jsx and write the login-related logic here.
In this file, we will have the signup method which takes username and password as payload and gets the authToken and RefreshToken
Below is the code for the login component which is responsible for handling the login functionality
import React, { useState } from 'react';
import axios from 'axios';

const Login = () => {
  const [credentials, setCredentials] = useState({
    email: '',
    password: ''
  });

  const handleChange = (e) => {
    setCredentials({
      ...credentials,
      [e.target.name]: e.target.value
    });
  };

  const handleSubmit = async (e) => {
    e.preventDefault();

    try {
      const response = await axios.post('/api/login', credentials);
      const { token, refreshToken } = response.data;

      // Store the tokens in localStorage or secure cookie for later use
      localStorage.setItem('token', token);
      localStorage.setItem('refreshToken', refreshToken);

      // Redirect or perform other actions upon successful login
    } catch (error) {
      // Handle login error
    }
  };

  return (
    <form onSubmit={handleSubmit}>
      <input
        type="email"
        name="email"
        value={credentials.email}
        onChange={handleChange}
      />
      <input
        type="password"
        name="password"
        value={credentials.password}
        onChange={handleChange}
      />
      <button type="submit">Login</button>
    </form>
  );
};

export default Login;
Let me explain what is happening in the above code.
First, we are asking users to get the username and password in a form component. We use
handleChangefunction to handle the changes to form.OnSubmitwe are making an API call to the backend on/api/loginendpoint, which is responsible for handling the authentication and login of the user.On successful login, we will be having the JWT
authTokenand JWTrefreshTokenwhich we set in the local store for future use. (Note: Saving JWT tokens to the local storage is not secure but for simplicity purposes, we will use this method.)
Setting Up Axios Interceptor for the JWT tokens.
In this step, we set up Axios Interceptor so that in every API call Axios automatically append the header with the bearer ${authToken}, which is used to authenticate and authorize the API calls to the backend.
import axios from 'axios';

const api = axios.create({
  baseURL: '/api',
});

// Add a request interceptor
api.interceptors.request.use(
  (config) => {
    const token = localStorage.getItem('token');
    if (token) {
      config.headers.Authorization = `Bearer ${token}`;
    }
    return config;
  },
  (error) => Promise.reject(error)
);

export default api
The above code solves the problem of authenticating each request but what about the JWT token expiration? What will we do when the JWT authToken expires? Now we can ask users to log in again but that is not a good UX, a better way is to automatically fetch the new JWT authToken if the JWT refreshToken exists.
To do that we will again use Axios interceptor but not at request but at response.
// Add a response interceptor
api.interceptors.response.use(
  (response) => response,
  async (error) => {
    const originalRequest = error.config;

    // If the error status is 401 and there is no originalRequest._retry flag,
    // it means the token has expired and we need to refresh it
    if (error.response.status === 401 && !originalRequest._retry) {
      originalRequest._retry = true;

      try {
        const refreshToken = localStorage.getItem('refreshToken');
        const response = await axios.post('/api/refresh-token', { refreshToken });
        const { token } = response.data;

        localStorage.setItem('token', token);

        // Retry the original request with the new token
        originalRequest.headers.Authorization = `Bearer ${token}`;
        return axios(originalRequest);
      } catch (error) {
        // Handle refresh token error or redirect to login
      }
    }

    return Promise.reject(error);
  }
);
So let me explain the code above so that we understand why we need interceptors and how the above code is working.
On each response error with the status code 401 which is the status code for Unauthorized and no retryFlag means that the JWT token has expired. Hence we need to fetch the new token using the JWTrefreshToken and then we set the newly generated JWT authToken and send the request again for the failed request.
In case of any JWT refreshToken error we can redirect to log in so that we can fetch new JWT authToken and JWTrefreshToken.
Using the above solution in our Application.
Now, you can use the api instance from the api.js files in your components to make authenticated requests. Here's an example of usage:
import React, { useEffect, useState } from 'react';
import api from './api';

const Profile = () => {
  const [user, setUser] = useState(null);

  useEffect(() => {
    const fetchProfile = async () => {
      try {
        const response = await api.get('/profile');
        setUser(response.data);
      } catch (error) {
        // Handle error or redirect to login
      }
    };

    fetchProfile();
  }, []);

  if (!user) {
    return <div>Loading...</div>;
  }

  return (
    <div>
      <h2>Welcome, {user.name}!</h2>
      <p>Email: {user.email}</p>
      {/* Render other user details */}
    </div>
  );
};

export default Profile;
TL;DR:
To implement authentication in a React application, one popular approach is to use JSON Web Tokens (JWT). Here's a summary of the steps involved:
Create a
Logincomponent that handles the login form and makes an API call to authenticate the user. Store the received JWTauthTokenand JWTrefreshTokenin localStorage.Set up an Axios instance with interceptors to automatically include the JWT
authTokenin the headers of authenticated API requests.Add a response interceptor to handle JWT token expiration. If a request receives a 401 error (Unauthorized) and there is a JWT
refreshTokenavailable, use it to fetch a new JWTauthTokenand update it in localStorage. Then retry the original request with the new authToken.Use the configured Axios instance in your components to make authenticated API calls.
Remember to handle errors, redirect to login on refreshToken failure, and consider security aspects when storing tokens.
By implementing JWT authentication with refresh tokens and using Axios interceptors, you can create a secure and efficient authentication system in your React application.